Embrace the ingenuity of rural living with these durable, budget-friendly projects that add charm, functionality, and self-reliance to your country homestead.
Introduction
Country living is as much about creativity and self-sufficiency as it is about wide-open spaces and fresh air. Whether you’re a lifelong redneck or just dipping your boots into rural life, equipping your homestead with practical, hands-on projects saves money, strengthens your skillset, and adds authentic character to your land. From building your own chicken coop to crafting rustic décor from reclaimed wood, this article lays out ten evergreen DIY projects perfect for the Country Redneck ethos. Each project combines simple materials, basic tools, and a dash of ingenuity so you can roll up your sleeves, grab a cold drink, and get straight to work.
1. Backyard Chicken Coop: Fresh Eggs on Demand
Why You Need It:
Raising a small flock provides daily fresh eggs, natural pest control, and entertaining backyard companions.
Materials & Tools:
- Pressure-treated lumber (2×4s and plywood)
- Hardware cloth (1/2″ mesh)
- Roofing sheets (corrugated metal or asphalt shingle)
- Hinges & hasp latch
- Exterior screws, roofing nails, and joist hangers
- Basic tools: circular saw, drill/driver, tape measure, level
Step-by-Step:
- Plan & Footprint (1–2 hours): Sketch a 4′×6′ base with 3′-high walls adjust to your space and flock size (4 – 6 hens).
- Build the Frame (3 – 4 hours): Cut and assemble 2×4 studs for floor joists and wall studs. Use joist hangers for extra support.
- Attach Walls & Roof (4 – 5 hours): Sheathe walls with plywood, cut openings for a nest box and door. Secure roofing sheets with nails.
- Install Hardware Cloth (2 – 3 hours): Wrap the lower half of the coop in hardware cloth to protect from predators bury edges 6″ into the ground.
- Finish Nest Box & Perches (1 – 2 hours): Add 12″×12″ nest boxes, a hinged lid for egg collection, and 2″-diameter perches inside.
Maintenance Tips:
- Clean bedding and nest boxes weekly.
- Check for hardware cloth holes and repair promptly.
- Paint or seal exterior wood to last 5–7 years.
2. Pallet Wood Raised Garden Beds: Grow Your Own Veggies
Why You Need It:
Raised beds warm up earlier in spring, improve drainage, and keep critters out.
Materials & Tools:
- Untreated shipping pallets (2–3 per bed)
- 3″ deck screws or carriage bolts
- Landscape fabric
- Topsoil mix (3 parts compost to 1 part soil)
- Circular saw, pry bar, drill/driver
Step-by-Step:
- Source Safe Pallets: Look for HT (heat-treated) stamps avoid chemically treated boards.
- Disassemble & Sort (2–3 hours): Use a pry bar to salvage 2×6 and 2×4 planks; remove nails.
- Frame Assembly (2 hours): Build 4′×8′ rectangles using 2×6 planks on the outside and 2×4 supports inside.
- Line & Fill (1–2 hours): Staple landscape fabric inside to prevent soil wash-out, then fill with soil/compost mix.
- Plant & Mulch: Sow seasonal vegetables or flowers; top with straw or wood chips to retain moisture.
Seasonal Care:
- Rotate crops yearly to avoid soil depletion.
- Top-dress with compost in spring and fall.
- Inspect wood annually; re-secure loose boards.
3. Rainwater Harvesting Barrel: Free Water for Your Garden
Why You Need It:
Collecting rainwater reduces utility costs, gives plants soft, chlorine-free water, and helps conserve local water resources.
Materials & Tools:
- 55-gallon food-grade plastic barrel with a sealed top
- Spigot kit (bulkhead fitting, brass spigot)
- Gutter diverter or downspout adapter
- Drill with hole saw (1.5″ and 3″ bits)
- Teflon tape and waterproof sealant
Step-by-Step:
- Positioning & Base (1 hour): Elevate barrel on cinder blocks or a sturdy stand for gravity flow.
- Cut Inlet & Overflow (1 hour): Drill top for diverter fitting; add overflow hole near the rim leading away from foundation.
- Install Spigot (30 minutes): Drill side hole near bottom, insert bulkhead fitting, seal with Teflon tape, and screw in spigot.
- Connect to Gutter (30 minutes): Attach diverter; ensure tight seal; divert overflow to garden or dry well.
Maintenance Tips:
- Screen barrel top to keep debris and mosquitoes out.
- Drain and clean every 6 months to prevent algae.
- Winterize by disconnecting and draining to avoid freezing damage.
4. Rustic Pallet Planter Boxes: Vertical Greenery
Why You Need It:
Pallet planters save horizontal space and create eye-catching green walls on fences or patios.
Materials & Tools:
- One HT pallet per planter
- Landscape fabric
- Staple gun and staples
- Potting soil and plants (herbs, succulents, annuals)
- Spray paint or sealant (optional)
Step-by-Step:
- Clean & Inspect Pallet: Remove protruding nails; sand rough spots to avoid splinters.
- Add Fabric Lining (1 hour): Staple landscape fabric to the back and bottom of pallet to hold soil.
- Mount Pallet (30 minutes): Secure to fence or wall with heavy-duty screws and anchor bolts.
- Fill & Plant (1 hour): Tuck soil into each pocket; plant root balls snugly. Water thoroughly.
Design Variations:
- Paint pallet frame with rustic whitewash or barn-red.
- Combine multiple pallets for a living wall.
- Use seasonal flowers for year-round color.
5. Mason Jar Sconces: Warm Country Lighting
Why You Need It:
These easy DIY sconces add southern charm to porches, living rooms, or barns perfect for holding candles or battery-powered fairy lights.
Materials & Tools:
- Mason jars (quart or pint, with lids removed)
- 1×4 pine boards (cut into 8″ lengths)
- Vintage-style cage light fixtures (optional, for wired versions)
- Wood screws, cup hooks, and metal hose clamps
- Drill, screwdriver, saw, wood stain or chalk paint
Step-by-Step:
- Prepare Backing Boards: Sand and stain or paint wood to desired finish; let dry completely.
- Mount Boards & Jars: Screw hose clamps to wood boards; attach lid bands to hold jars.
- Add Hooks & Lighting (30 minutes): Screw a cup hook at board top for hanging. For electric, secure light fixture inside jar and feed cord through a hole drilled in board.
- Insert Lighting: Use flameless LED candles or string lights for safety.
Styling Tips:
- Cluster three sconces of varying jar sizes.
- Accent with burlap ribbon or dried wildflowers.
- Use as herb drying racks by inverting jars and clipping stems under lids.
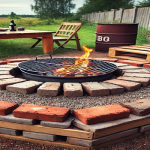
6. Homemade Fire Pit Ring: Gather ’Round the Flames
Why You Need It:
A fire pit extends your outdoor season, provides warmth, and draws family and friends together under the stars.
Materials & Tools:
- 10–12 reclaimed large bricks or pavers
- Gravel (2–3″ layer)
- Sand & soil
- Shovel, level, and tamper
Step-by-Step:
- Choose Location (30 minutes): At least 10′ from structures, overhead branches, and uphill burn hazards.
- Excavate & Level (1 hour): Dig a 6″-deep, 4′-diameter circle; fill with gravel, tamp flat.
- Lay Bricks (30 minutes): Arrange in a single ring on the gravel base; use sand between seams to stabilize.
- Build & Enjoy: Start with small fires to cure the ring; add larger logs over time. Always keep a bucket of water or extinguisher nearby.
Safety Tips:
- Monitor wind direction; never leave a fire unattended.
- Clear a 3′ perimeter of flammable materials.
- Douse coals completely before leaving.
7. Upcycled Barn Door Headboard: Sleep with Country Style
Why You Need It:
A barn-door headboard brings rustic warmth to any bedroom no power tools required if you buy pre-finished planks.
Materials & Tools:
- Two 6′ pre-finished barn-door planks
- Heavy-duty picture-hanger brackets (or a simple French cleat)
- Level and tape measure
Step-by-Step:
- Measure & Mark (15 minutes): Center planks behind your bed, leaving a 3 – 4″ gap between boards for visual interest.
- Mount Cleat or Brackets (20 minutes): Attach hardware to wall, ensuring studs or anchors support weight.
- Hang Planks & Adjust: Slide boards onto hardware, check level, and tighten any loose screws.
Decor Pairings:
- Hang a wreath or string lights across the headboard gap.
- Pair with plaid bedding and mason-jar sconces for full country flair.
8. Homemade Cornhole Boards: Backyard Competition
Why You Need It:
Cornhole is a classic southern pastime these DIY boards make tailgates, barbecues, and family reunions even more fun.
Materials & Tools:
- 2 sheets ½″ plywood (2′×4′)
- 2×4 lumber for frame and legs
- 6″-diameter hole saw
- Exterior paint and sealant
- Drill, screws, sandpaper
Step-by-Step:
- Frame & Top (1–2 hours): Build a 2′×4′ rectangle with 2×4s; attach plywood top.
- Cut Foot Hole (15 minutes): Center 6″ hole 9″ from top edge, 12″ from side edge.
- Attach Legs (30 minutes): Install folding legs with a 6″ rise for proper pitch.
- Paint & Protect (1–2 hours): Sand, prime, and paint boards in your favorite design. Seal with clear coat.
Game Tips:
- Use duck cloth for bean bags; fill with plastic pellets or dried corn.
- Keep boards dry and store indoors between uses to prevent warping.
9. Hand-Forged Hooks & Hangers: Functional Farmhouse Flair
Why You Need It:
Custom wrought-iron hooks add authenticity to your kitchen, mudroom, or barn ideal for hanging tools, coats, or supper plates.
Materials & Tools:
- ⅝″ round steel bar (12″ lengths)
- Propane forge or charcoal forge (DIY barrel forge)
- Anvil or sturdy steel block, hammer, tongs, safety gear
- Mounting screws and washers
Step-by-Step:
- Heat & Bend (1–2 hours): Forge tip to red-hot; bend into a 45° hook with hammer on anvil.
- Create Eye (30 minutes): Reheat end, wrap around a former (bolt or pipe) for a clean loop.
- Quench & Finish (15 minutes): Cool in oil or water; brush off scale.
- Mount (15 minutes): Pre-drill holes in wood or plaster; attach with screws and washers.
Design Variations:
- Twist shaft before bending for decorative flair.
- Add hammered texture by striking with a cross-peen hammer.
- Blacksmith initials or date for personalization.
10. DIY Storm Shelter Bench: Safety Meets Seating
Why You Need It:
In tornado country, a storm shelter is essential. This dual-purpose bench conceals an emergency escape hatch or access panel to your storm cellar.
Materials & Tools:
- 4×4 lumber for bench legs and frame
- 2×6 lumber for seat and support
- Side-opening storm cellar hatch or trapdoor kit
- Exterior hinges/latch, weatherstrip, exterior screws
- Circular saw, drill, level
Step-by-Step:
- Frame Footprint (1 hour): Build a 4′×2′ frame sized to hatch dimensions; reinforce center with cross beams.
- Attach Hatch (30 minutes): Install trapdoor flush in seat frame; add weatherstrip for seal.
- Build Bench (2 hours): Screw 2×6 seat slats atop frame; attach 4×4 legs with lag screws.
- Finish & Mount (1 hour): Paint or seal; place near cellar entrance for immediate shelter.
Emergency Tips:
- Keep flashlight, blankets, and first-aid kit stored under bench seat.
- Practice opening hatch quickly for family preparedness.
These ten DIY projects capture the spirit of true Country Redneck living: creative, resourceful, and deeply rooted in self-reliance. By building your own chicken coop, raised beds, rain barrel, and more, you’ll not only save money but also cultivate a homestead that reflects your independent spirit. Whether you’re crafting hand-forged hooks or upcycling pallets into planters, each project strengthens your connection to the land and your community. So grab your tools, fire up a cold one, and turn these evergreen ideas into tangible pride on your property.